Al's Robotics....
| Site
Index |
| Site Index |
| Rambo Auto Tools |
| Robotics Events |
| Linux Computing |
| Reading Books |
| Latest
News |
new information added to the Robux Project Pages click here for more info |
Servo modification tutorial.
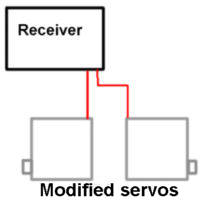
So you fancy modifying some servos, well this tutorial will tell and show you how to. When modified, servos act as speed controllers with motors and give your robot its propulsion unit. Servos can be easily modified for continuous motion, and this tutorial is going to show you how. Below is how the R/C gear is connected. It's the same as how you would normally connect your servos to the receiver or you can use a PIC micro to control the servos like ARM RAM.
Servo modification.
There are many types of servo but I believe (and I know!) the best for modification is the hitec HS-422 servos. These offer a substantial amount of torque 3.1 Kg/cm to be precise, which for a robot that's probably going to be no bigger then a CD case, will give you more then enough power. The best part about that servo is it's price at under ten quid you can't complain and also the last out put gear has metal bushes on so the pot can be removed with out disturbing the main gear (see photos below).
First step.
Take the servo apart carefully and DON'T loose any parts.
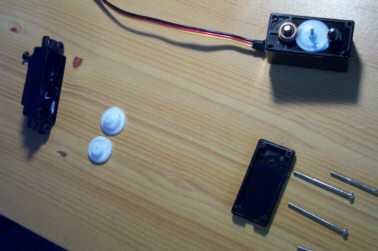
One hitec HS-422 servo
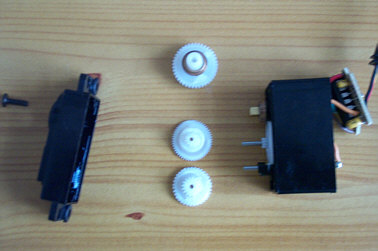
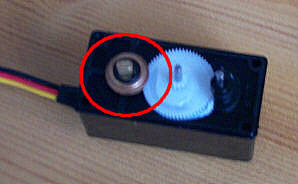
The last gear where you normally screw the servo horn onto is the one that all the modifications are going to take place on. It should look something like this (G1).
 <--G1
<--G1
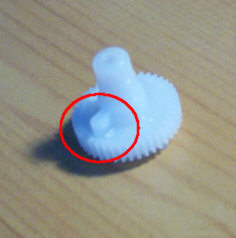 <--G2
<--G2
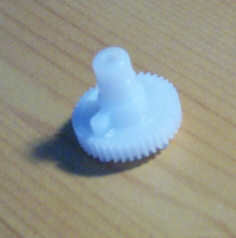
When you look at the main gear you should notice two things, if you place the gear like it is in photo G1, you will see a little square lump on it which jets out from the side, this stops it from turning all the way around so you will need to remove it (see picture G1 & G2 its the bit in the red circle). Use a sharp knife to cut it off.
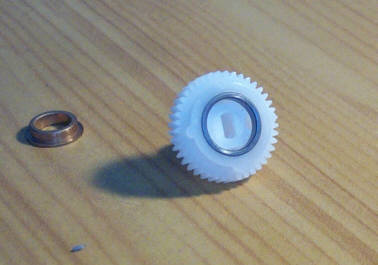 <--G3
<--G3
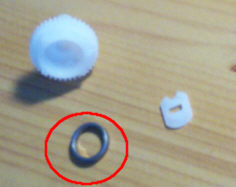 <--G4
<--G4
The second thing is how the gear is attached to the pot. The gear has a plastic insert inside (see photo G3) so the pot can grip the gear, you will need to remove it. To remove the plastic insert pull out the metal ring (see G4) and the plastic insert will fall out (the plastic insert will no longer be needed). Once you are finished replace the metal ring.
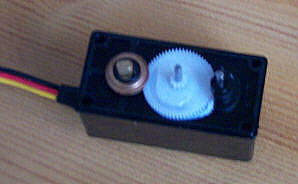
How to fix the pot.
To fix the pot into one position you first need to get the pot centralised. Do this by connecting the servo up to your R/C gear (DON'T put the servo back together before doing this) and turn it on, the motor will spin. Make sure that your transmitter joysticks and trims are cental and then start to slowly turn the pot on the servo, you will find a spot on the pot were the motor stops, that is were it should be left. Making sure the pot is in the right spot, and then use "UHU" glue ( use it because it is easy to remove should you need too ) to fix into position so it will be unable to move. Before gluing be certain that there is no grease on the pot as this would stop the glue from sticking. You will only require a small drop of glue to fix it.
Once the glue has dried put the servo back together and make sure that it has no problems and works fine. Now its time for you to start thinking about the robot design.
Web pages built and © by A R Martin E-mail at:
Home-page Robots Tutorials Links E-mail Circuits Events BEAM PIC Microchip Robotics Shop Computers FMM-RobotWars Sponsors Suggested reading Ebay Listings Serial Speed Controllers MicroMouse Walkers Driller-Killer Laptops Excaliber Robot Retox Drill Robot Robot motors Robot Builder Google Robux Project gorobotics Robot Cafe Robotics Solar Navigator PIC Axe Tech Supplies MUTR GSM Control Home Automation RC tracker Qtronics Design - Electronics & Firmware Design Artist R C Martin http://www.speedace.info/qtronics.htm http://www.solarnavigator.net/qtronics.htm http://www.elecdir.com/site/store/23197/index.html http://www.robotbuilder.co.uk/forum/topic.asp?whichpage=2&TOPIC_ID=861ᶱ